Gitsubmodules is probably one of the most confusing features git has to offer. Forget about the infamous rebases, I’m not even sure about how Gitsubmodules should be called.
Top 2 search results for the keyword “gitsubmodules”
So, is it “Git submodules” or “Gitsubmodules”?
But here are some quick answers that might help you get started with this feature.
The basics
When you first cloned a repository with submodules, you should do git submodule update --init, or if you want to also set up the submodules within the submodules, add a --recursive option to it.
You cannot directly edit the .gitsubmodules file, it doesn’t work!
Yes, adding a new section there won’t work. You will need to use the git submodule add command to add a new submodule.
What is actually adding the submodule is the commit that is automatically staged after you executed the command. Remember to commit them as if you unstage them it will be gone forever.
Submodules point to a specific commit, not to track a branch
If you are curious and cd into the directory where a submodule resides, and execute git status, you’ll realize the status reads something like “detached HEAD”. This is because submodules are set to track a specific commit, and not the latest commit of a branch.
To get the latest commit (which most of you probably want), you need to execute:
git submodule update --remote
And consequently you’ll see a new change appears in your unstaged files, which contains information about the new commit this submodule is pointing to. If you commit this change, when other people clone your repository and pull the submodules, they will get the exact commit you just checked out.
Python is a great language for tinkering around. It’s quick and easy to implement your ideas into code, but it’s not always easy to turn your code into sharable packages.
One of the most popular package manager is pip, and it relies on the PyPI repository. If you want to share your package with an easy-to-use pip install command, you have to publish your code as a package on PyPI.
But the process is not usually that straight forward when it comes to publishing a package. You can take a look at PyPI’s official guide on publishing a package. It’s a little bit overwhelming to say the least, despite the guide’s authors attempt by trying to ease the tension a little by incorporating everyone’s favorite: emoji.
Congratulations, you’ve packaged and distributed a Python project! ✨ 🍰 ✨.
“There must be an easier way to do this.” You might think. And you are absolutely right to think so.
Poetry
Introducing Poetry, a pip alternative that’s on steroid.
What does Poetry do? In short, it manages your packages for you: whether it’s managing your projects dependencies or packaging up your own packages.
That means Poetry can help you package up your project and publish it to PyPI, with minimal effort.
Installation of Poetry is relatively straight forward, however you must pay attention that Poetry is not installed using pip, and it is installed as a global package. When you are developing inside virtualenvs, you might want to instruct your virtualenv to copy global packages into the environment.
Poetry tries to automatically make use of the current Python version in the virtualenv, if there is one. So you generally don’t have to worry about weird compatibility issues or missing site-packages.
Publish Your Packages
Publishing your package is easy. If you already have a project that you have been working on for a while, you can initialize the environment by an interactive command:
# poetry init project-name
Poetry will ask you several questions relevant to the project. Examples include the type of license the project uses, the name of the authors, etc.
However, what Poetry asked here are the bare minimum. Oftentimes you want to include more information. You can add more information about the project by looking for the pyproject.toml Poetry just created.
Here is a sample file that includes some more configuration options, only parts relevant to the project information is shown:
...

name = "project-name"
version = "0.1.0"
description = "Some short descrption about the project."
authors = ["Your Name", "Second Name"]
license = "MIT License"
readme = "README.md"
homepage = "https://link-to-home-page.com"
repository = "https://link-to-repository.com"
keywords = ["Keyword1", "Keyword2"]
classifiers = ["Development Status :: 4 - Beta"]

...
You can find a more detailed explanation of the options inside Poetry’s documentation. It’s worth noting that some of the options require specific values from a list of allowed values, so consulting the documentation will be a good idea whenever you are in doubt.
Now we have all the information needed to publish a package. But before we can actually publish the package, we need to build the package first. To do that, use this simple command:
# poetry build
It’s important that your Python code is all inside a folder that has the same name as the project name you specified when you initialized the project using Poetry.
And after building, we can publish the package to PyPI (by default) using another simple command:
# poetry publish
Poetry will ask for your PyPI username and password, and after some uploading, your package is now published!
It’s just that easy.
Hopefully now you no longer have any excuses to not publish your projects on PyPI. Happy coding!
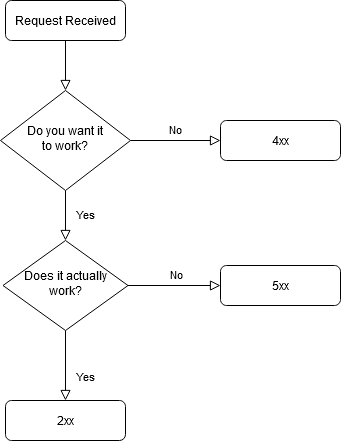
We’ve all come across this frustrating moment, that nothing more than a simple “it doesn’t work” is provided.
And you have 1 hour to fix it.
Does it really not work?
It might be a good idea to figure out if the claim truly holds.
Can the website be accessed on your laptop?
Can the website be accessed on your phone, with cellular data?
Can your friends in another timezone access it?
Does the browser show any useful information?
It kinda works, but in a whacky way
Or, you only get a white screen.
Are any of the external resources your front-end references working? (Open your developer console and check the network tab)
Does clearing the local cache help it?
When nobody can access it
It’s a good sign for you to become worried. But you don’t need to panic yet.
Is the web server running?
Is the edge router/reverse proxy/load balancer running?
Is your service running?
Is your DNS record correct?
Is your SSL certificate valid?
When the above checks all pass without issues, you can now panic a little. And check the following:
Does the server still exist?
Is the server connected to the internet, and is listening on the correct ports?
Can you at least ping the server?
To be honest, at this point there’s not a whole lot you can do. The problem is probably beyond what you can fix. (Maybe the datacenter went offline, for example.)
When only some of us can access it
If this is the conclusion, then you can probably pinpoint the problem along the way as the request travels from the client to your server. Something went wrong during that time.
Did you recently updated your DNS record?
Are the people who cannot access the website at least getting the correct IP address resolved?
Can the people who cannot access the website at least ping your server?
What are your thoughts on multi-threading in Python?
A common interview question
Like many veteran Python programmer, you probably already know the answer: because of the Global Interpreter Lock, (in the context of the CPython interpreter) Python actually doesn’t run more than one thread at any given moment.
You’ll probably also go on and talk about why Python’s multi-threading is still relevant: it is good for IO intensive applications. When a thread is often blocked for IO, being suspended by the GIL doesn’t actually affect performance that much. Rather, other threads that are not waiting on IO to complete get the chance to be executed, giving us the illusion of concurrent execution.
All of these answers are good answers, and would usually satisfy even the most serious interviewers. But here’s a follow-up question that often take people off guard:
So because of the GIL, Python essentially runs one thread at a time. Does this mean Python is by default thread safe?
A follow-up question.
At the surface, it seems to make sense. But it is also easy to give a counter-example with some poorly designed multi-threading application:
Imagine we have two threads updating on a shared variable V. Let’s say V currently has the value of 5, and thread 1 takes the value of V, but before it could update V, its execution is suspended by the GIL. Now thread 2 acquires the value of V, does its calculations and decides to update it by decrement it by 3. Now V has the value of 2. At this time, GIL hands back execution to thread 1, which decides to increment V by 1. Given the original value of V, (from thread 1’s perspective) 5, thread 1 sets the value of V to 6.
We have now lost the updates made to V by thread 2. Python is not thread safe by default, even with GIL.
To demonstrate this clearly, let’s consider the following example, which involves a simple shared variable update:
from threading import Thread

class WillThisWork:
    a = 0

    def add_by_one_many_times(self):
        for _ in range(1000000):
            self.a += 1

test = WillThisWork()
threads = [Thread(target=test.add_by_one_many_times) for _ in range(5)]

for thread in threads:
    thread.start()

for thread in threads:
    thread.join()

print("The value of a is: {}".format(test.a))
If the += operation is thread safe, then we should expect to see the final value of a to be 5000000.
$ The value of a is: 2044547
$ The value of a is: 2514763
$ The value of a is: 1417187
After running the code multiple times, it seems that we never get the full 5000000 in the output, suggesting the += operation is not thread safe.
It seems that GIL was able to stop the operation right inside a +=. How does it manage to do that? To answer the question we’ll make use of the disassembler utility dis. If we disassemble the add_by_one_many_times() function into its corresponding Python byte code, we get the following:
Here we can clearly see that the simple (on source code level) += operation is actually multiple byte codes, spanning from offset 16 to 24. When the GIL stops the execution of a thread, it stops it at the byte code level. So it is entirely possible to find your thread loaded with old values that are no longer relevant after GIL releases control back to it.
And in fact, very few things we write can be executed in a single byte code. One exception being function calls to C functions wrapped in Python. The built-in sorted() function is one such example.
You are a new computer science graduate, besides a big student loan balance, you also have the big dream of joining a famous tech company and become a software engineer.
You crafted your LinkedIn profile: you connected with your uncle who runs a catering service; you debated on if you should list Spanish as one of the languages you speak (you’ve taken two semesters of Spanish in high school); you uploaded your resume, which managed to be a page long after you included the two summer jobs at Arby’s and McDonald’s.
You sent out applications. You waited, anxiously.
A new email appeared in your inbox:
Hi,
This is Ashley from Goomazon’s Talent Acquisition Team. I came across your resume and think that you might be a good fit for a role here.
The email that just came
Your heart almost stopped beating, and you read on. The email seems unusually long. You read about Goomazon’s culture, their latest projects, and a new bright future despite the “current situations”. Everything sounds good, and you just want to work there!
At the end of the email, a lone paragraph stands out from the rest: it’s in a different font, and the font-size is ridiculously large. You read carefully:
To get everything started, please take some time to complete our online coding challenge. The coding challenge will take about 1.5 hours to complete, so please set aside some uninterrupted time to make sure you can answer the questions at your best.
That same email that just came
The Coding Challenge
“Hey, it’s just like HackerRank!” You exclaimed as the link takes you to a familiar IDE window inside your browser.
The comfort of familiarity eases your nervousness a little. You scrolled through the T&C, you agreed to the privacy policy without reading it.
You started the coding challenge.
“Ha!” You read the first question. It asks you to find the k-th largest number in an unsorted array. “That’s so easy.”
def find_k(arr, k):
# complete your code here
    return sorted(arr)[k - 1]
After thanking the guy named Tim for his awesome sorting algorithm, you clicked on Run All Test. A bold move nonetheless, but you knew that your code is correct.
The tests passed, every single one of them. An adrenaline rush hits you, your already shaky hands from caffeine abuse is now shaking even more.
Submitting your answers, you move on to the second question with some newly found confidence.
Suffix and Prefix?
You are baffled, to say the least.
After overcoming the initial shock of seeing an entire wall of question descriptions, you’ve got some good idea about what the question wants: you have a string, they want you to find sum of the length of common prefixes between each suffix of the string and the original string.
That means, suppose you have a string “ABCD”, you’ll have suffixes “ABCD”, “BCD”, “CD” and “D”. Because none of the suffix share any prefix with the original string “ABCD”, the length of common prefixes is 0.
You have an intuition. You can just take each sub-string and compare it from start to end with the original string. And you started coding:
def common_prefix(string):
    length = 0
    for i in range(len(string)):
        sub_string = string[i:]
        for j, c in enumerate(sub_string):
            if string[i] != c:
                break
            else:
                length += 1
    return length
Satisfied with what you just wrote done, you trace the code in your mind.
“Oh no it’s O(n^2).” Your heart sinks as you come to the saddening realization.
The Big-O
You see, it’s not difficult to see why an O(n^2) algorithm isn’t ideal: if the input size increases by a factor of 10, the execution time will increase by a factor of 100.
It grows very fast.
Let’s go back a little bit and figure out why the algorithm you just wrote is indeed O(n^2). First we have a for loop :
for i in range(len(string))
Which itself is n operations, if we let n be the length of the string. Then inside this for loop, we have another for loop to check if the suffix have a common prefix with the original string:
for j, c in enumerate(sub_string)
The number of operations here equals the length of sub-string varies. But as the length of the sub-string varies through out the outer loop, we should look at the average length of this sub-string.
Given the shortest sub-string has length 0 and the longest sub-string has the same length as the string, which is n, we can get the total length of all the sub-strings by (0 + n) * (n + 1) / 2. The average length of a sub-string is (0 + n) * (n + 1) / 2 / (n + 1), which in turn is conveniently n / 2. This means that on average, our inner for loop has a time complexity of O(n / 2).
The proof of correctness of the above calculations is left as an exercise for the reader.
Armed with the knowledge of the complexity of both the outer and inner for loops, we can derive the overall complexity of the algorithm by multiplying them together. (Intuitively you can think about “doing n/2 tasks n times.”) This eventually give us an overall complexity of O(1/2 n^2), which can be further simplified to O(n^2).
“But wait”, you objected, pointing out that the break statement inside your inner loop should keep run time at a reasonable level. After all, you are stopping calculations when it’s apparent that it’s not going anywhere. It gotta help, right?
It is not hard to come up with an example where your algorithm will defy the performance boost provided by the break and make your life truly miserable:
Imagine the string “AAAAAAAAA … AA”, where each and every character in the string is A. In this case, each and every suffix of the string shares a common prefix with the original string that is exactly the entirety of the suffix strings.
And this is exactly one of the test cases that your algorithm will fail at. Not only did the test designers gave you a string that only has the letter A, there are also 10^5 of them.
You are speechless.
Z Algorithm
The Basic Idea
If you are familiar with competitive coding or having done some coding exercises on websites like Leetcode or HackerRank, you are probably already familiar with the idea of memoization and dynamic programing.
The idea behind the approach is simple: you try to make use of information that you’ve already obtained to speed up later calculations. In the example of Fibonacci numbers, you can store the value of fib(5) to help with the calculation of fib(6).
If we record the information we’ve already obtained in the prefix problem, by recording the length of longest common prefix at each starting position i in the string, we might have something like this:
string
a
b
c
e
a
b
f
g
i
i
0
1
2
3
4
5
6
7
8
length
9
0
0
0
2
0
0
0
0
Longest common prefix at various starting positions of a string.
Again if you are comfortable with dynamic programming, this table looks very similar to a recursion table.
So, maybe we can make use of the prefix length we have calculated to our advantage.
Imagine you have a string, AAAFFFFAAAFFF. And it’s easy to spot two repeating patterns of AAA within the string.
By observation, we can see that inside the second AAA, the second A shares the same prefix length as the second A in the first AAA. And the third A shares the same as the third A in the first AAA.
This is a great discovery. With this knowledge in mind, we can begin crafting our algorithm.
The Algorithm
The Naive Approach. We must have something to start with when building our prefix table. So we have to make use the naive algorithm when we have no information available from previous calculations.
The Meoization Approach. We can keep track of how far we’ve scanned the string to find a matching pattern. If you think of the process as scanning from left to right, then we can keep track of the right-most position we have visited.
This right-most position tells us how far to the right, from index 0, can we use already computed values of prefix lengths as a starting point of our calculation for the current position on the string.
string
a
a
a
f
a
a
a
f
f
i
0
1
2
3
4
5
6
7
8
length
9
2
1
0
1
2
3
0
0
Longest common prefix at various starting positions of a string.
Consider the prefix table above. We are at index 4, and we have used the naive approach to find out that we have a prefix match up to index 6. In this case, 6 will be our right-most position we have “scanned” so far, with respect to the current position at index 4.
This gives us a very big advantage for positions after index 4. When we move onto index 5, since we know index 5 is within a matched prefix pattern, that the prefix length at index 6 should be no different from the prefix length at index 1. (Index 6 and index 1 are both the second element of the aaa pattern.)
This is when the speed-up comes, when we no longer have to use the naive approach to calculate the prefix length at a certain position.
It is worth noting that the prefix length at index 0 is a special case. It is always the length of the entire string by definition, but this value will be problematic in actual use. For example, at index 4, the prefix length can never be 9, since it’s inside the original string.
To make things simple, we can initialize the prefix length at index 0 to 0. This way, we can avoid the problem mentioned above.
Implementation
def zfunction(string: str) -> list:
    z = [0]  # initialize the prefix table
    j = 0  # right-most index

    for i in range(1, len(string)):
        # make use of old data
        if i < j + z[j]:
            # if current index is to the left of right-most
            # index, meaning we can make use of old data.
            #
            # i-j is the relative position of the current
            # index in the previous matched segment we want
            # to make use of. and z[i-j] is the memoized
            # prefix lenght.
            #
            # j+z[j]-i is the prefix length at current index
            # given by the current matched segment.
            #
            # we choose the min value because we do not yet
            # know how far to the right we can keep matching
            # in our current matched segment. and this task
            # is completed by the naive approach later.
            z[i].append(min(z[i - j], j + z[j] - i))
        else:
            # when no old data can be used, we set it to 0,
            # and let the naive approach do its work
            z[i].append(0)

        # naive approach
        while i + z[i] < len(string) and string[z[i]] == string[i + z[i]]:
            z[i] += 1

        # update right-most index, this happens if we can find
        # an even longer prefix match at current index i.
        #
        # here we are essentially comparing the length of each
        # "matched" segment.
        if i + z[i] > j + z[j]:
            j = i


    z[0] = len(string)  # setting z[0] by definition
    return z
Credits and Further Reading
Please refer to the following awesomely written article that inspired this work.
Relying on Docker’s network documentation we know that there are the following types of networks offered by Docker.
Name
Description
bridge
For standalone containers to talk to each other.
host
Only for swarm services. No isolation between host and container, and the container uses host’s network directly.
overlay
Allows swarm services on different nodes to talk with each other. Allows swarm services to talk to standalone containers. Allows standalone containers on different nodes to talk with each other.
macvlan
Allows containers to have their own MAC address, and the docker daemon routes traffic using MAC addresses. Used to provide compatibility to legacy applications that expects direct connection to a physical network.
none
Containers attached to it have no networking.
Docker network types.
The Exercise
To put theory into practice, let’s suppose we have a legitimate situation at hand that requires the use of an overlay network for our swarm cluster.
Inside the cluster, we have two nodes, A and B, where A is the swarm manager. Let’s say we want all ingress network traffic to go to A, on which a Traefik instance runs to distribute the traffic to B, on which our application runs.
To make this happen, we have to solve the following problems when it comes to networking:
Problem
Solution
Make sure incoming traffic from clients goes to A.
We can configure our DNS records to point our domain to A.
This can be done with a simple A record. And in the case of IPV6, an AAAA record. (I know, the name is silly.)
Make sure traffic arriving at A is correctly forwarded to B.
We can make use of Traefik.
To make it work, we have to make sure B is discoverable by Traefik. This means that we need to put A and B on the same network so they have the possibility to talk to each other. We also need to make sure B comes with the correct docker flags to tell Traefik that it’s providing a service and requires Traefik to provide routing support.
Make sure B correctly advertise it to Traefik as providing services.
We can add the following lines to B’s docker-compose.yml:
- "traefik.enable=true" tells Traefik this is a service. - "traefik.http.routers.api.rule=Host(`yourdomain.com`)" tells Traefik how to route the incoming requests. In this case, we instruct Traefik to forward all requests with a host value yourdomian.com to B.
Make sure A and B are on the same network.
This is the point at which I’m stuck. 😕
The Theory
With Traefik running on A, and applications running on B, it seems natural that we need to have an overlay network for Traefik and applications to attach to, such that they can talk to each other.
We can easily create a new network on the swarm manager node (you cannot create a new network on a regular swarm node).
Here we used the --driver option to specify that we want an overlay network, otherwise it will defaults to a bridged network. And the --attachable option informs Docker that we intend to attach containers to this network. Without the explicit --attachable option, you cannot attach containers. Finally we name the network swarm-net.
Then to make use of the newly created network, we modify the docker-compose.yml files for our services to point network to swarm-net.
All seem good. We created an overlay network, which in theory should allow services on different swarm nodes to talk to each other.
And launching the services indeed went smoothly. But there is only one minor problem: our Traefik instance is not discovering any of the applications on B.
Here are some profound knowledge I’ve gathered so far:
Using Traefik to route its own traffic is absolutely workable, you just need to:
make sure Traefik itself is discoverable by Traefik, and
setup certificate using tls.certresolver, and
setup basic auth if insecure mode is not enabled, it seems to be required.
Understand that a 404 error most likely means the docker-compose file is somehow incorrect, or is missing tags required by Traefik.
Make sure spellings are correct. A misspelled file name or middleware name will not cause docker-compose to die.
Watch for indentation errors in your .yml files. The way docker-compose complain about a malformed .yml file is not very straight-forward. But at least it fails immediately when this does happen.
You must use htpasswd to generate your basic auth passwords. To install it, it is under the apache2-utils package for apt.
You have to either docker-compose up or docker-compose create before some changes to the docker-compose file will take effect.
For each subdomain needing a certificate, you must have a corresponding A record for that subdomain, if you are using --certificatesresolvers.mytlschallenge.acme.tlschallenge=true.
there’s gotta be a way to put a wildcard cert in the certificate store and make Traefik use that
There’s absolutely one reason: I’m trying to get Traefik to work with WordPress as an arbitrary exercise to figure out how to have Traefik handle the certificates and routing.